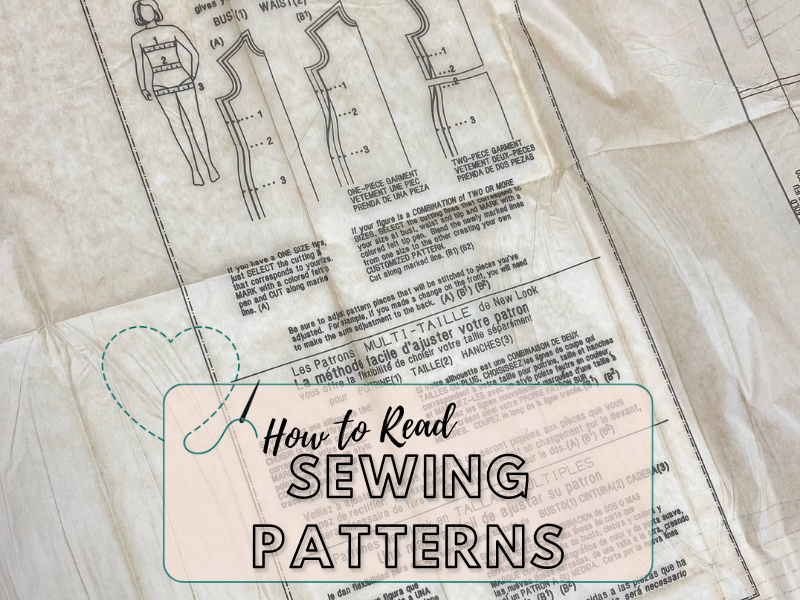
Reading Sewing Patterns can be daunting, but understanding all the lines and markings will help you to produce better fitting garments.
When I was learning commercial pattern cutting and design, I quickly to realised the significance of understanding and interpreting sewing patterns. My own patterns were scantily marked, because I was the only one who used them! Once I had to send my patterns out to be cut and made by others, I knew that communicating as much information was crucial to producing good quality, well fitting garments. From then on, I made sure all my patterns had all the necessary instructions to anyone who had to use the, from the cutter to the last sewing machinist. The ability to read sewing patterns is crucial for any aspiring sewist, as it acts as a roadmap guiding you through the fascinating world of fabrics, stitches, and designs. Mastering sewing patterns can be the difference between a well-constructed garment and a project that ends up in the scrap pile.
Overview of How to Read a Sewing Pattern
As a friendly guide, I’m here to help you navigate the intricacies of sewing patterns, ensuring you have the necessary knowledge to create stunning pieces with confidence. In this article, we’ll delve into the various symbols found on sewing patterns, explore the information provided on pattern envelopes, decipher pattern instructions, and share valuable tips to make your sewing experience an enjoyable one.
Whether you’re a complete novice seeking advice on sewing for beginners or an experienced sewist looking to refresh your skills, this comprehensive guide is sure to refine your understanding of sewing patterns and enhance your sewing prowess. So, let’s begin our journey into the art of reading sewing patterns, and take a step closer to becoming a master sewist.
Understanding Sewing Pattern Symbols
Embarking on an exciting sewing journey begins with understanding the various symbols found in sewing patterns. These symbols are paramount in guiding you through the process, ensuring your project’s success. In this section, we’ll delve into the most common symbols you’ll encounter when working with sewing patterns.
Cutting Lines
Cutting lines are the foundation of any sewing project. They indicate the edges of the pattern pieces and dictate where you should cut your fabric. Typically, these lines are bold and solid, making them easy to identify. Remember to follow these lines precisely, as any deviations may affect the final fit and appearance of your creation. For a beginner project, try and find a single size pattern to start with, once you’ve mastered this, you can go on to multi-size patterns. These have nested sizes printed with a different cutting lines, and they can be confusing if you’ve never used a pattern before.
Grain Lines
The grain line is a crucial element in sewing, as it directs the fabric’s orientation. Usually represented by a straight line with arrows at both ends, grain lines ensure that the fabric’s lengthwise and crosswise grains align correctly, maintaining the garment’s shape and drape. Align the grain line parallel to the fabric’s selvage when cutting out your pattern pieces.
Notches
Notches are small markings on the cutting lines that serve as a guide for aligning pattern pieces during the sewing process. They can appear as single or multiple triangles pointing outward from the cutting line. It’s vital to transfer these notches onto your fabric, as they’ll help you match up seams and other design elements accurately. There is a convention of notch marking, one notch on a front piece, two notches on the back, etc., so these are useful for identifying cut pieces later. Notches, or Balance Marks should be snipped perpendicular to the cut edge, and should not extend further than ¼” or 6mm to prevent meeting the seam line. I also like to add centre notches for things like collars, centre front neck too. Centre notches are not always included, particularly on folded edges, but I believe they are essential for accurate assembly of pieces.
Darts
Darts are triangular or diamond-shaped symbols used to shape a garment by removing excess fabric. They help create a tailored fit and can be found in various areas, such as the bust, waist, and hips. To sew darts, simply fold the fabric along the dart’s centerline and stitch from either the wide end to the point, or from point to point. If you’re new to sewing darts, check out this helpful guide on how to sew a dart.
Pleats and Gathers
Pleats and gathers are techniques used to add fullness or shape to a garment. Pleats are formed by folding the fabric and stitching it in place, while gathers involve pulling the fabric together with a loose stitch. Pleats are usually denoted by a series of lines with arrows indicating the folding direction. Gathers, on the other hand, are represented by a pair of parallel lines accompanied by an asterisk or the word “gather.” To learn more about sewing pleats and gathers, consider starting with some easy sewing projects for beginners.
Zipper Placement
In sewing patterns, zipper placement is often indicated by a series of short, diagonal lines along the garment’s edge. These lines guide you in positioning and sewing the zipper to achieve a professional finish. If you’re unsure about installing a zipper, check out our comprehensive tutorial on how to sew a zipper. I like to add a few more balance marks along the zip position, so that I can also mark onto the zip tapes for extra matching reference.
In summary, familiarising yourself with these essential sewing pattern symbols will significantly enhance your sewing experience. As you grow more confident in your skills, you’ll find that understanding these symbols becomes second nature, allowing you to tackle more intricate projects with ease. So, grab your favourite sewing pattern and start exploring the wonderful world of sewing!
Reading the Pattern Envelope
Before diving into the actual sewing process, it’s crucial to familiarise yourself with the pattern envelope. This seemingly unassuming package holds a wealth of information that will guide you through your sewing journey. In this section, we’ll explore the sizing information, fabric suggestions, and required notions that can be found on the pattern envelope.
Sizing Information
The first thing you’ll want to check on the pattern envelope is the sizing information. This will help you determine which size of the pattern to cut and sew. Most patterns include a range of sizes, and it’s essential to choose the one that corresponds to your measurements. Remember, ready-to-wear sizes may differ from sewing pattern sizes, so always refer to the measurements provided on the pattern envelope.
To find your size, you’ll need to take your body measurements and compare them to the chart on the pattern envelope. Some common measurements include bust, waist, and hip circumference. Keep in mind that some patterns may also require additional measurements like arm length or inseam, depending on the garment you’re creating.
Fabric Suggestions
Next, let’s move on to fabric suggestions. The pattern envelope will typically provide recommendations for the types of fabric that work best with the specific design. This information is crucial because the fabric’s weight, drape, and stretch can dramatically affect the final outcome of your garment.
For instance, a structured jacket might require a heavy, non-stretch fabric, while a flowy dress might call for a lightweight, drapey material. As a beginner, it’s a good idea to stick with the recommended fabrics until you become more comfortable with understanding how different materials behave.
Most patterns may also indicate the required fabric yardage for each size and view, usually in a table to include different fabric widths. This is important to know before purchasing your fabric, so you have enough material to complete your project. Don’t forget to consider any additional fabric for pattern matching, if necessary.
Required Notions
Last but not least, the pattern envelope will list the required notions. Notions are the small tools and accessories you’ll need to complete your sewing project, such as buttons, zippers, or elastic. Make sure to gather all your required notions before starting your project, so you don’t run into any unexpected roadblocks along the way.
Additionally, the pattern envelope may also indicate if any specific sewing techniques are used in the construction of the garment. For instance, if the pattern requires the insertion of a zipper, you might want to brush up on how to sew a zipper before tackling the project.
In summary, the pattern envelope is your roadmap to a successful sewing project. By carefully reviewing the sizing information, fabric suggestions, and required notions, you’ll have a solid foundation for creating a beautiful, well-fitted garment. As you gain experience and confidence in your sewing skills, you’ll become more adept at interpreting and customising patterns to suit your unique style and preferences.
Decoding Pattern Instructions
As you delve deeper into sewing, you’ll find that understanding pattern instructions is essential for a successful project. In this section, I’ll break down the various components of pattern instructions to help you navigate them with ease.
Cutting Layouts
The cutting layout is a diagram that shows you how to arrange your fabric pieces on the material to make the most efficient use of it. Patterns often include multiple layouts to accommodate different fabric widths and sizes. It’s important to follow these layouts carefully to ensure you don’t waste fabric or end up with pieces cut incorrectly.
To make the cutting process easier, I recommend folding your fabric as directed in the layout and using sewing weights to hold the pattern pieces in place, then pin to keep every flat and in place. Once everything is secure, use sharp scissors to cut your fabric with precision. Lots of tutorials suggest using a rotary cutter, but these are not always ideal. While these cutters are great for straight lines and outward curves and corners, getting right into an inward curve or corner can be difficult to achieve.
Preparation
Before you settle down to sew, make sure that you have every you need to hand, any pieces that require fusible interfacing can be made ready to sew, pressing and basting where necessary. Marking of dart positions, pocket placements and matching of notches may be easier to do when standing at a table.
Sewing Steps
After cutting your fabric, it’s time to start preparing to stitch! The sewing steps are the core of pattern instructions, guiding you through the construction of your project. These steps are typically numbered and accompanied by illustrations to provide a visual aid.
It’s essential to read through the entire sewing steps section before you begin, as it will give you a clear understanding of the construction process. If you come across any unfamiliar terms or techniques, take a moment to research sewing terminology or refer to specific tutorials, like how to sew a dart or how to sew a zipper.
Underpressing
As you follow the stages of sewing your garment, there will be times when underpressing – pressing seams open, facing edges, seam allowances on patch pockets, for example. Don’t be tempted to skip these vital steps, preparing your work for the next sewing operation will vastly improve quality, and the act of going over the pieces will alert you to anything that needs redoing.
Finishing Techniques
The final part of pattern instructions is finishing techniques. This section focuses on the details that give your project a polished, professional appearance. Finishing techniques include hemming, sewing buttonholes, and adding any necessary closures.
One popular finishing method is how to hem a dress or pants, which involves folding the fabric edge under and stitching it down to create a clean, finished edge. Another essential skill is how to sew buttons, as buttons are a common closure used in sewing projects.
Take the time to complete these finishing touches, as they can truly elevate the final result of your project. With practice, you’ll develop a keen eye for detail and the ability to execute these techniques flawlessly.
In conclusion, decoding pattern instructions is a crucial skill for mastering sewing. Begin with simple projects and gradually work your way up to more complex patterns. Remember to research sewing terminology and practice with inexpensive fabric to build confidence in your abilities. With time and dedication, you’ll soon be creating beautiful, professional-quality garments and accessories. Happy sewing!
Tips for Reading Sewing Patterns
Embarking on your sewing journey can be both exciting and overwhelming, especially when it comes to reading and understanding sewing patterns. To help you develop your sewing skills and become more confident in your abilities, here are some tips to make the process more enjoyable and manageable.
Start with Simple Patterns
As a beginner, it’s essential to start with simple patterns that allow you to develop your skills gradually. By choosing beginner sewing projects, you’ll have the opportunity to familiarise yourself with sewing terminology and techniques without feeling overwhelmed by complex instructions.
Simple patterns often include fewer pieces, making it easier to cut and assemble your project. As you progress, you can gradually move on to more intricate designs, building on your knowledge and skills.
Research Sewing Terminology
Understanding sewing terminology is crucial when it comes to reading sewing patterns. Before diving into a project, take the time to research common sewing terms you may encounter. This will not only help you understand the instructions but also enhance your overall sewing experience.
Some essential terms to familiarise yourself with include seams, darts, notches, and grain lines. You can find explanations and examples of these terms in various sewing resources, such as sewing for beginners articles and tutorials. I’m compiling a Glossary post as I create these posts, come back and check here to see what I’ve added.
Practice with Inexpensive Fabric
As the saying goes, practice makes perfect. When learning how to read and follow sewing patterns, it’s a good idea to practice with inexpensive fabric before moving on to more costly materials. This will allow you to experiment and make mistakes without breaking the bank.
You can find affordable fabric at local markets, clearance sales, or even in your own closet – repurpose old clothes or bed linens to create practice projects. As you become more confident in your sewing abilities, you can invest in higher-quality fabrics for your creations.
By starting with simple patterns, researching sewing terminology, and practising with inexpensive fabric, you’ll be well on your way to mastering sewing patterns. Remember, every sewist, no matter how experienced, was once a beginner – so be patient with yourself and enjoy the journey.
Conclusion
Importance of Mastering Sewing Patterns
In conclusion, mastering sewing patterns is an essential skill for any aspiring or experienced seamstress. It enables you to create garments and projects with a professional finish, as well as open up a world of creative possibilities. By understanding the symbols, reading the pattern envelope, and decoding pattern instructions, you’ll be well on your way to fashioning a diverse range of items, from simple beginner sewing projects to more complex creations like how to make a dress.
Moreover, being adept at interpreting sewing patterns allows you to customise and adapt designs to suit your unique style and preferences. It is a crucial foundation for anyone who wants to excel in the world of sewing and fashion design.
Encouragement for Continued Learning
Embarking on your sewing journey may seem intimidating at first, but I encourage you to persevere and continue learning. Start with simple patterns and gradually progress to more intricate designs as your confidence grows. Don’t shy away from seeking help or enrolling in a sewing class for beginners if you feel overwhelmed.
Furthermore, remember that practice makes perfect. Don’t be disheartened if your initial attempts aren’t flawless – instead, use inexpensive fabric to hone your skills and familiarise yourself with various sewing techniques. Through dedication and persistence, you’ll soon be able to read sewing patterns like a pro and create stunning, tailored garments that showcase your talent and creativity.
So, keep your sewing machine humming, and let the inspiration flow! As you continue to develop your skills, you’ll find that the world of sewing offers endless possibilities for personal expression and growth. Happy sewing!
Di you do classes on fitting at all. I can sew but find it difficult to always get the right fit
Yes, I do. I teach how to fit your measurements when using commercial patterns, and also bespoke block pattern making. The first option teaches you how to make some basic styles, for example; bodice, skirt, sleeve, trousers, that you’ll use to modify patterns produced by companies like Simplicity, McCalls, Vogue, etc.
The second course shows you how to make detailed master patterns from which to develop your own designs. This can also be used with commercial patterns, but is more advanced and longer in duration.
In the first instance, I would recommend the pattern fitting class, as this is shorter and sets you up to use your existing sewing skills to immediately improve the fit, and therefore, the quality of your garments.
Hi,
1. When are your classes
2, How long and how much are your classes
3. Do you have to commit to a course or individual lessons
4. Can pupils decide what to make
I have some knowledge of dressmaking, but i am not confident in altering patterns and basic clothing projects to achieve a comfortable fit and good finish. Plus a few other areas I would like to gain knowledge of.
I look forward to hearing from you
My classes are bookable according to requirements, the minimum course is 1 hour and prices start at £30. I teach mainly one to one, and on an “as needs” basis, some pupils want to learn how to use a sewing machine, or to make an individual garment. Unless advertised, courses are made to suit the student, my job is to help any to learn how to complete a project on their wish list! I have helped brides to style their own weddings, fashion students to create their collections and home sewists to make decorative accessories for the house. Pattern alteration is a favourite project for me – not everyone has the time to learn pattern cutting from scratch, but I can teach how to make commercial patterns fit beautifully. Combining pattern styles and adding details is the perfect way to design your own wardrobe.